I have been working with Flutter for a few years now and have thoroughly enjoyed working with it to build complex UIs effortlessly in mobile and web.
Flutter uses Dart as its programming language. Dart is a language that seems to take the best aspects of many programming languages and brings them all together to form an easy-to-use language. Dart is easy and familiar to adopt regardless of your development background or is easy to learn if you are starting out developing for the first time. More to come on Dart in future posts.

The Flutter and Dart documentation provided by Google is vast, But with so much documentation out there is it can be hard to know where to start. This is why I am writing this "_getting started_" guide to try to help new developers get started with Flutter.
When I am trying to help new brand new developers learn how to work with Flutter and Dart, the constant struggle is getting the development environment setup. My goal with this post is to get your local environment setup as quickly and efficiently as possible.
This article will be the first of many documenting the ways to use Flutter and Dart to build a beautiful cross-platform application.
Getting VS Code
VS Code is my favorite text editor to use right now. Its benefits include being super lightweight to initially get downloaded and working. It has tons of customizability and many available extensions that allow you to make the tool work for what you need it to work for.
Best of all it is the perfect tool to work with flutter. Its pairing with the Flutter CLI is the perfect developer environment match for building flutter apps. The steps to download and get VS Code up and running can be found here: Download VS Code (Mac/Linux/Windows)
A key tool that you must have for Flutter development in VS code is the Flutter Extension, this plugin will allow you to run your emulator for VS Code as well as many other useful features.
A guide to using VS Code for Flutter development
Installing Android Studio (For Windows and Mac Users)
Android studio is not required to download while developing for Flutter however I have found that downloading Android Studio makes getting the Android Emulator running much easier without a bunch of extra steps.
By downloading Android Studio the Android SDK will be downloaded to the file location that VS Code will be looking for. If you have done Android development, you know what a pain setting the SDK location can be. Another benefit is by default you will get at least one emulator to use from jump street which is nice to get you going quickly.
Another big reason to use Android Studio is when you need to debug Android platform code the developer experience is much better in android studio than it is in VS Code.
Installing Xcode (For Mac users)
Downloading Xcode is a must for Apple Development. Unfortunately when developing for apple devices you are required to have a Mac computer in order to run the Apple Simulator or to even run your app on your physical iPhone.
One big component that gives you the tools required to do Apple development is Xcode. In this case unlike Android Studio, Xcode is required software. Similar to Android Studio, Xcode also gives you a much better developer experience when developing and debugging platform specific code
Install Xcode from the app store
Outside of Xcode you will have to download Cocoapods
brew install cocoapods
gem install cocoapods
Install Flutter SDK (Dart gets installed with Flutter... Bonus!!!)
The easiest way to install the Flutter for your platform is to go to the Flutter Website where they have in an in depth guide to installing the Flutter SDK.
Install Flutter for Windows
Install Flutter for MacOS
Flutter Doctor is your friend
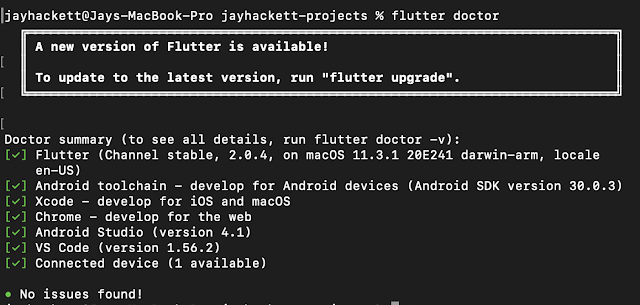
Once you get all of the supporting software installed you are ready to run flutter doctor from the terminal. Flutter will let you know if you have installed everything correctly. It will also let you know if it can find your flutter SDK, Android SDK and which version is installed.
One thing that always comes up the first time I setup my Flutter environment from scratch is the need to accept certain android licenses. flutter doctor will tell you the command to run but it will look something like this: flutter doctor --android-licenses
In order to accept the licenses follow the prompts and you should be on your way.
This is not an exhaustive list of things that you will run across when setting up your Flutter environment, but it should get you well on your way. If you have any questions on getting started with Flutter feel free to reach out to me on Twitter @codingjock


Comments
Post a Comment